Repair instructions for brake callipers - Teves floating brake callipers FN series | HELLA
Removing and installing the disc brake
General information
As this type of floating calliper brake is fitted in many modern vehicle models, these repair instructions can also be applied to other vehicle models with identical brake callipers.
Schematic representations, figures and descriptions serve only the purpose of explanation and presentation of the document texts and cannot be used as a basis for carrying out the repair.
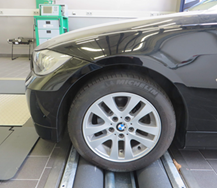
The following repair instructions are set out using a BMW 320i (E90) as an example.
Repair instructions
Repair work on brake systems is only allowed to be carried out by qualified specialists.
The vehicle manufacturer's maintenance and safety instructions and also the product-specific installation instructions are to be observed for all repairs to the brake system.
Preparatory work
Before the repair, it is advisable to check all relevant components in the area of the axle suspension and wheel brakes for damage. These would include tyres, brake hoses and wishbones.
- Drive vehicle on to a lifting platform
- Remove front wheels
- Carry out a visual inspection
- Defective parts are to be replaced

The repair
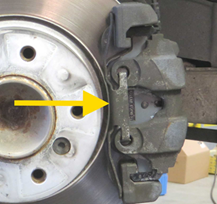
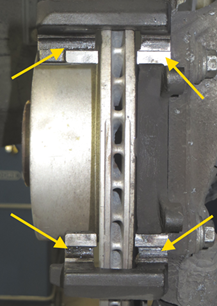
Remove the housing retaining spring.
Press the retaining spring in the direction of the arrow against the spring tension and remove it from the side
Check the retaining spring for damage and replace it if necessary.
Important:
The retaining spring is under preload.
If it jumps sideways, it could cause injury.
For vehicles older than 48 months, we recommend replacing the retaining spring as part of the brake repair!
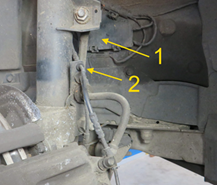
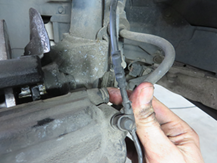
Unclip the wiring harness of the brake pad wear indicator.
To do this, open the connector housing (1) in the wheel well, unlock the connector plug and unhook the wiring harness from the combination bracket (2).
Important!
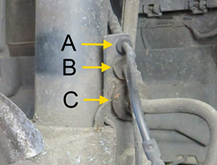
The following component connections are securely fixed in the combination bracket on the suspension strut.
Brake pad wear indicator connecting cable (A)
- ABS sensor connecting cable (B)
- Brake hose brake calliper (C)
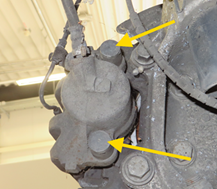
Remove the two protective plugs from the guide bolts.
Check protective plugs and damping sleeves for damage.
Defective parts are to be replaced
Please note:
Ingress of water and dirt can lead to corrosion of the guide bolts and thus to limited function of the brake calliper.
This can be a possible cause of one-sided braking behaviour or premature wear.
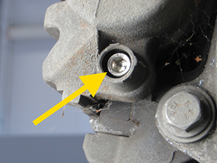
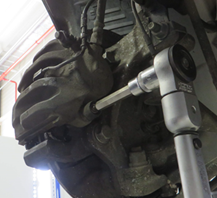
Undo and remove the two fastening screws (guide bolts).
Tools required: Allen key 7 mm
Remove the brake calliper from the brake calliper carrier.
- Make sure that the brake hose is not twisted or kinked
- If necessary, unhook the brake hose from the bracket on the suspension strut
Please note:
In order to avoid damage, do not leave the brake calliper hanging from the brake hose!

Bremssattel mit geeignetem Haken am Federbein hochbinden.
- Hierbei ist zu beachten dass der Bremsschlauch nicht verdreht oder geknickt wird
- Gegebenenfalls Bremsschlauch an der Halterung am Federbein aushängen
Hinweis:
Um Beschädigungen zu vermeiden den Bremssattel nicht am Bremsschlauch hängen lassen!

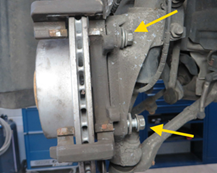
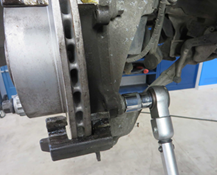
Loosen and unscrew the two fastening screws of the brake calliper carrier.
Remove the brake calliper carrier and check for damage.
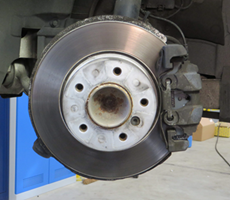
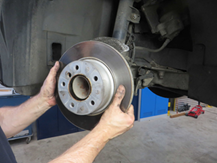
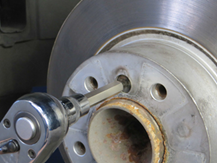
Removing the brake disc
Loosen fastening screw
Remove brake disc
Info on loosening the brake disc.
If the brake discs are stuck, carefully tap the bottom of the brake disc pot with a rubber hammer.
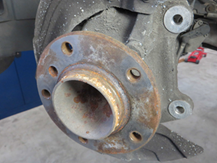
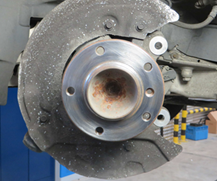
Check wheel hub.
Check the surface for corrosion and damage
Check thread for damage
Turn wheel hub and check wheel bearing for synchronisation and play
Clean the contact surface of the wheel hub with a suitable tool.
- Remove impurities and traces of corrosion.
Please note:
Unevenness on the contact surface can lead to warping of the brake disc and thus to lateral run-out!
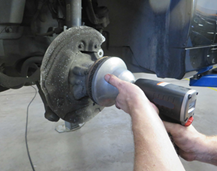
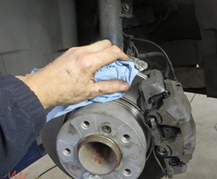
The contact surface of the wheel hub must be undamaged, rust-free, clean and metallically bright. In order to protect against corrosion, spray the contact surface with a thin layer of spray oil and wipe with a lint-free cloth.
Please note:
Do not grease the surface of the wheel hub excessively after cleaning!
Through rotation the grease can get onto the brake.
- This can affect the fastening of the wheel or the tightening torque of the wheel bolts.
Fit the brake disc and secure with the fixing screw.
Please note:
Observe the tightening torque!
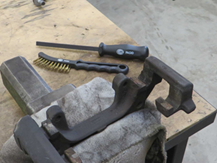
Prepare the brake calliper carrier for installation.
To do this, we recommend removing the carrier and clamping it in a vice.
Clean the carrier with brake cleaner
Carefully remove any corrosion on the guide surfaces with a wire brush or file
Important:
Mechanical damage to the guide surfaces must be avoided at all costs!
Installing the brake calliper carrier
Insert and tighten screws
Observe the tightening torque!
Then apply a thin layer of non-conductive and metal-free brake paste to the cleaned contact surfaces on the calliper carrier.
Important!
Before greasing, insert the new brake pads into the carrier as a test to check the clearance and fit on the contact surfaces.
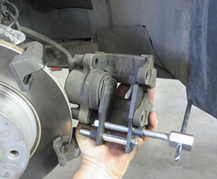
Press the brake piston all the way back with the reset tool.
Check the dust protection sleeve of the piston for a correct fit and for any damage.
Please note:
When pushing back the pistons, check the brake fluid level in the expansion tank.
If necessary, empty the tank beforehand.
Clean the brake calliper with brake cleaner.
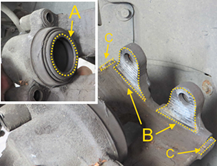
Apply a thin layer of brake paste to the contact surface (A) of the brake piston.
Clean the contact surface (B) and also apply a thin coat of brake paste.
Clean the contact surface (C) hammer heads / brake callipers and apply a thin coat of brake paste.
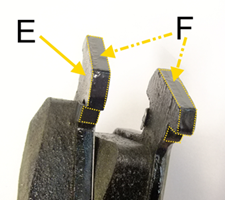
Install the brake pads.
New brake padsonly to be greased thinly with metal-free permanent lubricanton the hammer head (E), in the area of the contact surfaces (F) and on the brake calliper.
Insert the outer brake pad into the calliper carrier
Insert the piston-side pad into the brake calliper.
Place the brake calliper onto the calliper carrier.
Please note:
Only install new brake pads if the brake disc thickness is greater than the brake disc minimum thickness (MIN TH).
Clean the guide screws and check for damage.
Check thread
Damaged screws are to be replaced
After cleaning, apply a thin layer of grease to the sliding surfaces of the guide screws. Only use a silicone-based grease in this area.

Caution!
The dust protection sleeve of the brake piston and the
protective plugs and damping sleeves of the calliper guide must not come into contact with oils or lubricants based on mineral oil. Swelling of the elastomers can damage them.

Fit the brake calliper and secure with the guide screws.
Hook the brake hose and wear indicator cable into the combination bracket once again
Insert retaining spring
Please note
Observe the tightening torque!
Install and connect a new brake pad wear indicator.
Ensure that the wear indicator is correctly seated in the brake pad
Clip the wiring and brake hose back onto the combination bracket.
Please note:
Make sure that the brake hose is not twisted and is correctly fixed in the bracket.
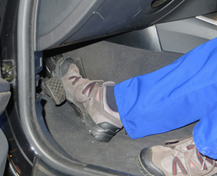
Depress the brake pedal several times with a maximum of two thirds of the pedal travel so that the brake pads and brake pistons reach their working position.
Please note:
Fully depressing the pedal can damage the master brake cylinder!
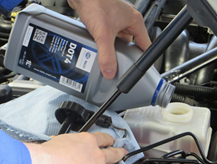
Check the brake fluid level in the expansion tank and top up to the "MAX" mark if necessary.
Change the brake fluid if necessary.
Please note:
Only use new brake fluid approved for the vehicle type.
Clean the brake disc after fitting the brake calliper
The friction ring must be free of dirt and grease
The disc pot and the threads must be clean and free of foreign bodies.
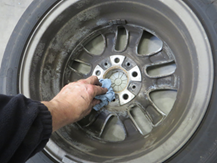
Mount the wheels.
Clean the contact surface of the rim before mounting the wheel
Please observe the tightening torque of the wheel bolts!
Service reset
After the brake pad and wear indicator have been replaced, the Condition Based Service display is to be reset with a suitable diagnostic device in accordance with the vehicle manufacturer's specifications.
Info:
The CBS maintenance system analyses the actual service requirements in the vehicle. It measures the condition of the most important wear parts and operating fluids and monitors the individual scopes of service.

Functional test and test drive
After the repair, it is essential to carry out a functional test on the brake system.
Run in the brake system as specified by the vehicle manufacturer during a test drive.
Carry out a functional test on the brake system using a brake tester
Extra information
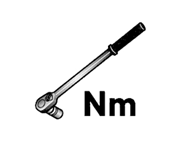
Tightening torques:
BMW E90/ 320i/ N46 as the example vehicle
Tightening torques for the wheel brakes on the front axle
Brake disc to wheel hub bolt (16 Nm)
M 12x1.5 bolt on the brake carrier (110 Nm)
Brake calliper guide screw / hexagon socket width across flats 7 (30 Nm)
- Wheel bolt (120 Nm)
Further testing options:
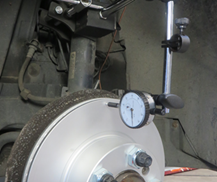
In order to avoid, at an early stage, the problem of brake rubbing while driving, the lateral run-out of the new brake disc should be checked with a suitable dial gauge in accordance with the vehicle manufacturer's specifications.
If the tolerance values are not reached, the wheel hub and the wheel bearing have to be checked.
You will find further helpful content on this in the Technical Information documentation:
- “Checking the lateral run-out of the brake disc”
- “Checking the lateral run-out of the wheel hub”
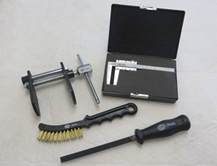
We recommend the following products for the carrying out of a safe repair:
Tools:
Brake disc calliper gauges - 8PE 355 290-001
Brake calliper brush - 8PE 355 290-031
Brake piston pressure tool - 8PE 355 290-081
Brake calliper file - 8PE 355 290-091
Cleaning agents and lubricants:
· Brake cleaner - 8DX 355 370-001 / 500 ml
Metal-free permanent lubricant for disc brakes 8DX 355 370-011 / 75 ml
- Brake fluid - 8DF 355 360-021 / 1L