ABS/ESP control units for braking and driving dynamics

Important safety note

The following technical information and practical tips have been compiled by HELLA in order to provide professional support to vehicle workshops in their day-to-day work. The information provided on this website is intended for suitably qualified personnel only.

1. Basics

Brake system hydraulic unit with control unit for braking and driving dynamics

The hydraulic unit of the brake system with its control unit for braking and driving dynamics has become part of standard equipment in many vehicle models.

The Electronic Stability Programme (ESP) has the task of preventing lateral swerving when cornering or when faced with critical situations, e.g. during extreme driving manoeuvres. The system specifically intervenes in the braking system and in the engine and transmission management and keeps the vehicle on track. It is important that during such intervention physical laws cannot be overridden. As soon as the limits are exceeded, even the ESP system cannot prevent the vehicle from swerving.

As the number of vehicles equipped with ABS/ASR or ESP increases, not surprisingly the frequency of faults and the need for repairs in the workshop also increase.

Hydraulic unit of the brake system

The hydraulic unit contains the shift valves for the individual wheel brakes, which are necessary for the controlling of brake pressure. They are used in the hydraulic unit to control the 3 pressure states that require regulation: i.e. building up pressure, maintaining pressure, reducing pressure.
The hydraulic pump is used to generate the necessary admission pressure on the intake side of the return pump of the ABS system . The return pump is not able to build up the necessary initial pressure if the brake pedal is not depressed and there is no pressure present in the system.

Control unit for braking and driving dynamics

The control unit for braking and driving dynamics is usually fitted to the hydraulic unit.

The control unit consists of a powerful computer. So as to ensure the highest possible safety levels, the system consists of two computers with their own power supply and diagnostic interface, which use the same software. All information is processed in parallel and the computers monitor each other. The control unit is also responsible for controlling the ABS/ASR and the ESP. All systems are combined in one control unit.

2. Troubleshooting

Failure of ABS/ESP system

If the ABS/ESP system fails, this will be indicated by the control lamp lighting up permanently. A visual inspection should always be carried out in every case before complex and time-consuming diagnostics work is undertaken. During such inspection, particular attention should be paid to checking whether any leaks are present or whether components are damaged. If no abnormalities are detected during the visual inspection, a diagnostic unit is then used for further testing.

The ABS/ESP system has a self-diagnostic feature. This means it detects errors such as line interruptions, short circuits to earth(ground) or positive and also defects in the sensors. These errors can be stored in the error memory of the control unit and read. A diagnosis can be carried out on the ABS/ESP system with an appropriate diagnostic unit. Depending on the unit used, there is a wide range of testing possibilities available, checks which go as far as including a specially prescribed system test.

1

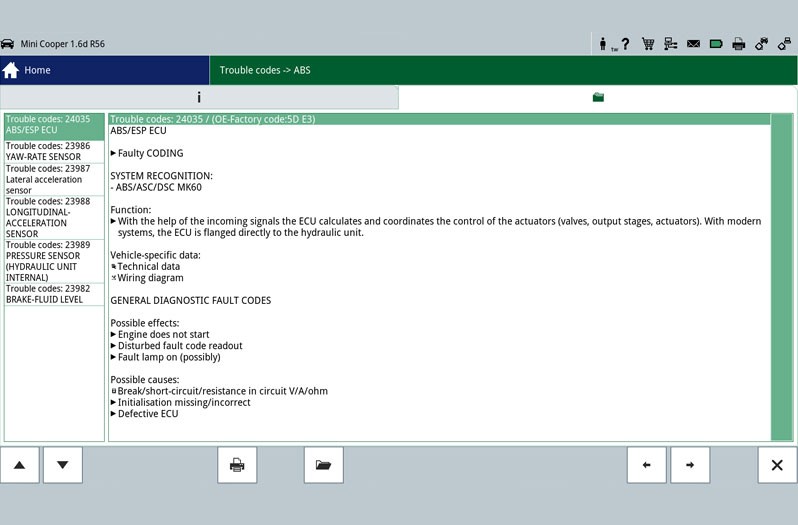
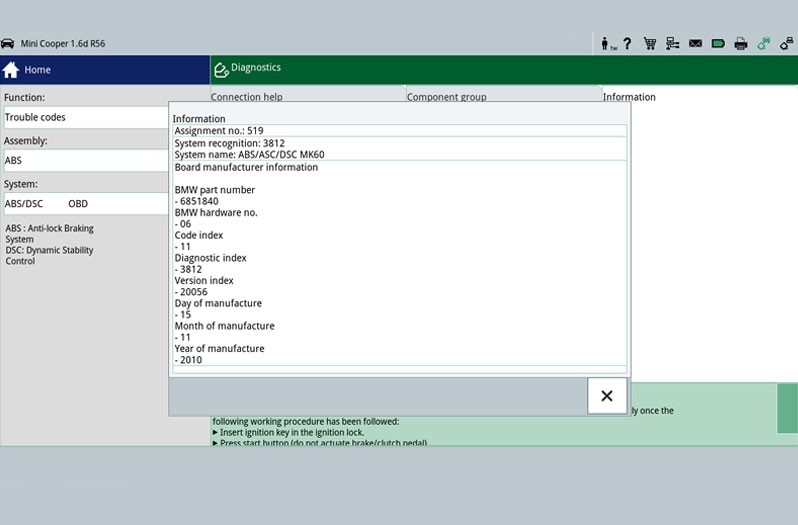
Reading the error memory

The first step is the reading out of the error memory. Any errors that occur are stored here and provide initial indications of the possible cause of the error. The stored error can give a direct indication about a defective component (Figure - Error memory 2) or about a short circuit/cable interruption. This allows targeted repair work to be carried out.

2

Reading parameters

If no errors are stored in the error memory, parameters can be read out and evaluated specifically with the aid of an actual value query. Technical documents with the required set points are necessary for the evaluating of the displayed actual values, unless these are stored in the diagnostic unit. Errors which are stored in the error memory are also displayed during the actual value query.

3

Actuator test

Another test option is the actuator test. During this test, individual components can be controlled by the diagnostic unit and thus their functioning checked.

4

Basic setting

In this function, components, such as the sensors of the vehicle dynamics control system, can be set or adapted according to manufacturer values. The prerequisite for a basic setting is a vehicle system in perfect working order.

5

Identification

Special system and control unit information can be called up here.

6

Circuit diagrams

System-specific circuit diagrams can be taken from vehicle information and used for troubleshooting purposes. This is where the PIN assignment on the control unit plug or the cable colours can be read and used for further testing on the electric vacuum pump or on the brake booster pressure sensor.

Important

The various diagnostic possibilities were illustrated using the mega macs 77 diagnostic unit on a MINI ONE 1.6 R56 as an example. The relevant depth of inspection and the variety of functions depend on each individual system configuration of the control unit.

3. Effects

Fault in the electrical system

If a fault is detected in the electrical system, the following measures are initiated:

  • The ABS/ESP system is switched off. The brake system continues to work in the usual way.
  • The fault is shown by the ABS/ESP indicator/control light
4. Important information

Important repair instructions

The following repair instructions are to be strictly observed!

  • Because of its intervention in the brake system, the braking and driving dynamics control unit or the brake system hydraulic unit may only be replaced by trained personnel.
  • After installation of the ABS control unit, it is necessary to adapt it to the vehicle! Please use a suitable diagnostic unit for this purpose.
  • For all repair work on the brake system, please observe the safety and installation instructions provided by the system or vehicle manufacturer in question.
  • If necessary, please use the installation or removal tools specified by the vehicle manufacturer.
  • Repair work that is carried out incorrectly can lead to system failure and to severe personal injuries
  • A
  • B
  • C
  • D
  • E
  • F
  • G
  • H
  • I
  • J
  • K
  • L
  • M
  • N
  • O
  • P
  • Q
  • R
  • S
  • T
  • U
  • V
  • W
  • X
  • Y
  • Z

Anti-lock braking system (ABS)

Prevents the wheels from locking during braking. The steerability and lane stability of the vehicle are maintained.

Electronic stability programme (ESP)

Prevents the vehicle from swerving or skidding by targeted intervention in the brake system and the engine control.

Traction control system (ASR)

Prevents the drive wheels from spinning, on snow or ice, by intervening in the brake system and the engine control.

How helpful is this article for you?

Not helpful at all
5
4
3
2
1
Very helpful
Success

Wrong Captcha

Wrong Captcha

Error

Something went wrong

Spare Parts Finder
Manualy Oe-No. Universal Parts
Top manufacturers
Other manufacturers
Vehicle series Back
Vehicle Back

Enter the OE number in the input field. You will usually find the OE number on the spare part itself or in the vehicle documents.

Spare Parts Finder
Simple vehicle identification Also determine spare parts with OE numbers Detailed product information Find wholesalers near you
dummy
Processing Selected Car

Choose category:
Back
dummy
Teilen Sie
Send via Copy link
URL copied to the clickboard !
Article NUmber
Number
Article Number Was Copied !
Search The Web Mounting Instructions
More Details
Name Value
Less Details

Your Dealer
Autoteile Krammer GmbH
dummy
Lechstraße 1-3
68199 Mannheim
Show Map

You might also be interested in

NOx-Sensor - Mercedes Benz
Basic Knowledge
NOx-Sensor - Mercedes Benz
If a fault is diagnosed in the NOx sensor when troubleshooting an exhaust gas purification system, this can present a small challenge for a workshop.
Reading time: 7 minute
Checking an alternator regulator
Basic Knowledge
Checking an alternator regulator
Function and design of the overrunning alternator pulley explained - including installation instructions for the overrunning alternator pulley on the alternator.
Reading time: 12 minute
Media pump
Basic Knowledge
Media pump - design, function and troubleshooting
Find out more about the function and system integration of the medium pump as well as testing and repair options.
Reading time: 7 minute
Generator freewheel function and installation instructions
Basic Knowledge
Function and assembly of the alternator freewheel clutch explained
Function and design of the overrunning alternator pulley explained - including installation instructions for the overrunning alternator pulley on the alternator.
Reading time: 2 minutes
Damage assessment starter motor
Basic Knowledge
Alternator damage assessment
How to diagnose damage to the alternator: from corrosion and short circuits to bearing damage.
Reading time: 1 minute
Damage assessment starter motor
Basic Knowledge
Starter damage assessment
Faulty starter motor? Discover typical causes such as overloading or misfiring and how to repair damage effectively.
Reading time: 1 minute
Check multifunction controller
Basic Knowledge
Check multi-function regulator
Find out how to check the multifunction regulator, measure the generator voltage and ensure that the regulator is functioning correctly.
Reading time: 4 minute
Testing alternators
Basic Knowledge
Checking the alternator
Detailed solutions for problems with the alternator - from testing to troubleshooting, everything for your vehicle workshop.
Reading time: 8 minute
Check the starter
Basic Knowledge
Checking the starter - Causes of failure, troubleshooting
Everything you need to know about typical starter motor faults and how to rectify them - with instructions for testing and repair.
Reading time: 9 minute
Service work on the loading system
Basic Knowledge
Service work on the charging system
Step-by-step instructions for servicing the charging system, including visual inspection and signal testing on the controller.
Reading time: 6 minute

Great! Just one more Step

Subscription successful

Head to your inbox and confirm your email address so that you don’t miss our updates!

Get ready for brand new technical videos, car repair advice, trainings, helpful diagnostic tips, marketing campaigns and much more... delivered straight to your inbox every two weeks!