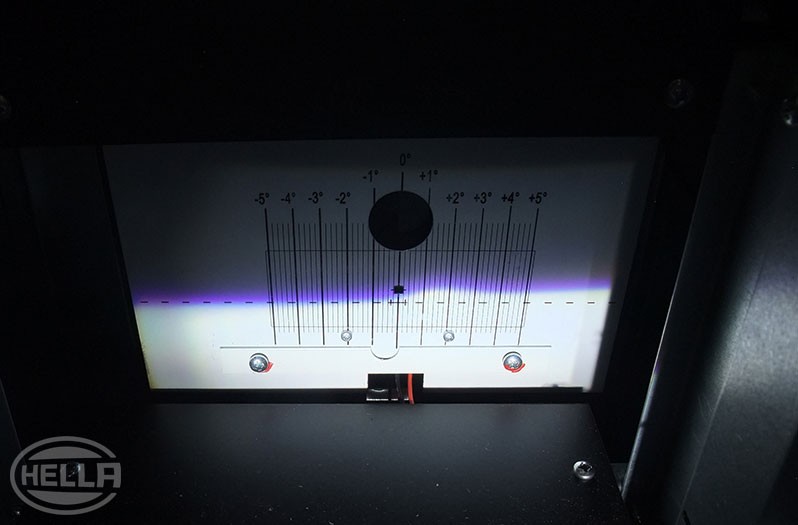
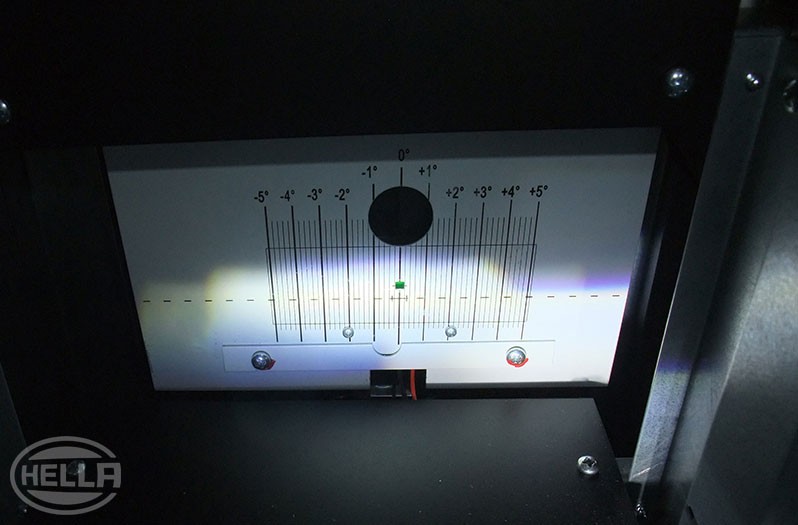
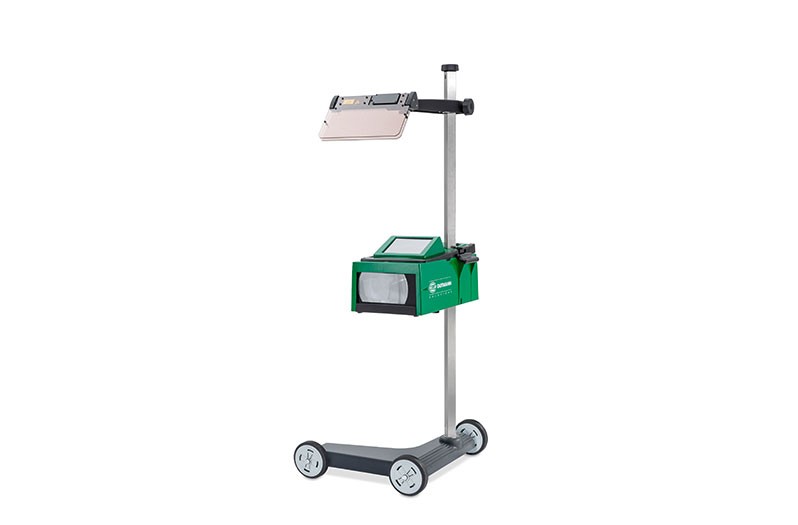
Light distribution

Every driver is familiar with the "dipped beam" and "main beam" lighting functions. In addition, modern lighting systems offer further possibilities for light distribution and, in compliance with legal requirements, bring out the maximum possible in road illumination. Here you can find out what tips and tricks make this work and what new lighting functions, such as those for country road lighting, really entail.

Important safety note

The following technical information and practical tips have been compiled by HELLA in order to provide professional support to vehicle workshops in their day-to-day work. The information provided on this website is intended for suitably qualified personnel only.

1. Comparison

Light distribution - dipped beam

The dipped beam is an important component of vehicle lighting and is a statutory requirement for every vehicle. The essential purpose of the dipped beam is to provide safe lighting of the road at close range without dazzling other road users. Special requirements therefore exist in relation to the luminous intensity and to the light distribution, which is generally asymmetrical. The dipped beam also ensures that the vehicle is easily visible to other road users in the dark.

Halogen headlamps, dipped beam

With halogen headlamps , the light distribution in the area of the asymmetrical light component shows a significant 15° increase. This has been and also remains the most widespread light distribution to date. The continuous increase in the asymmetrical component is also typical of this characteristic. Because it is a halogen lamp, the light colour is whitish yellow.

The adjacent graph illustrates the light distribution in which the symmetrical light component to the left of the vertical "zero line" (oncoming traffic) runs just below the dotted "cut-off line". This means that oncoming drivers will not be dazzled. The asymmetrical light distribution increases the range in order to improve visibility of the driver's own lane and of the right-hand edge of the lane.

Bi-xenon headlamps, dipped beam

The dipped beam distribution of bi-xenon headlamps shows a flatter increase (12°) in the asymmetrical light component. The increase is between 12° and 75° for an increasing number of headlamps. The structure of the asymmetrical light component shows a "kink", which, however, does not mean that the headlamp is defective. As a result of the high light intensity, this structural shape is necessary in order to ensure that the requirements for specific lux values in light distribution are not exceeded and are in accordance with the relevant ECE regulations. Because of the xenon system and its associated higher kelvin value, the light colour is whitish blue.

In the light distribution graph shown, the symmetrical light component runs just below the dotted "cut-off line" to the left of the vertical "zero line" (oncoming traffic). This means that oncoming drivers will not be dazzled. The asymmetrical light distribution increases the visibility of the driver's own lane and of its edge.

LED headlamps, dipped beam

With this LED dipped beam light distribution, the increase in the asymmetrical light component is similar to the previous bi-xenon system. There is a "kink" in the structure of the asymmetrical light component (see arrow). This does not mean that the headlamp is defective in any way. The purpose of the increase is to identify black and white guide posts or the centre line marking more easily and sooner.

In the graph, the symmetrical light component to the left of the vertical "zero line" (oncoming traffic) runs just under the dotted "cut-off line". This means that oncoming drivers will not be dazzled. However, a small asymmetrical increase in the light distribution can be clearly seen on the left-hand side.

2. Comparison

Light distribution of main beam and country road lighting

In addition to the dipped beam, the main beam is also a mandatory part of vehicle lighting. In contrast to the dipped beam, the main beam illuminates the road to the maximum possible extent. The main beam is therefore predominantly used on very dark sections of road without oncoming traffic where it is difficult to see what lies ahead, thus significantly increasing visibility and therefore safety on such roads. This is also the case when driving at higher speeds. In addition, the main beam is used to operate the headlamp flasher.

Classic main beam

The main beam distribution, which can be seen on the photos/test screens, clearly shows the differences between the classic main beam and that of an LED headlamp. The classic main beam describes a rather more punctiform or oval illumination around the centre mark (small square).

LED headlamp, main beam

The main beam of the LED headlamp illuminates a much larger surface area. Although in this case the greatest light intensity is also around the centre mark, the light can be distributed over a wider area as a result of the greater "light output" from the headlamp.

LED headlamp, country road light

This light distribution is only activated once a specific speed has been reached. Depending on the manufacturer, this is between 50 and 80 km/h.

Raising the cut-off line (shown in the graph) in the area on the left improves the illumination of the road and the verges. The asymmetrical light component of 60° is steeper and the "kink" can be seen much earlier.

3. Practical example

Photos of halogen headlamps - VW Beetle:

In this practical example, we show the measurement results of H4 halogen headlamps using a "Classic Cars" VW Beetle 1303 convertible produced in 1979. The light settings were tested using both an analogue SEG IV and a digital/camera-based SEG V for dipped beam and main beam.

The vehicle has to stand on a flat test surface for measurements to be taken. The country-specific regulations regarding locations for headlamp adjustments/beam setting and vehicle manufacturer instructions are to be observed.

Note: Connect the charger to ensure correct battery and vehicle electrical system voltage. Carry out a visual inspection for damage to the headlamp, replace defective bulbs in pairs.

1

Analogue beamsetter

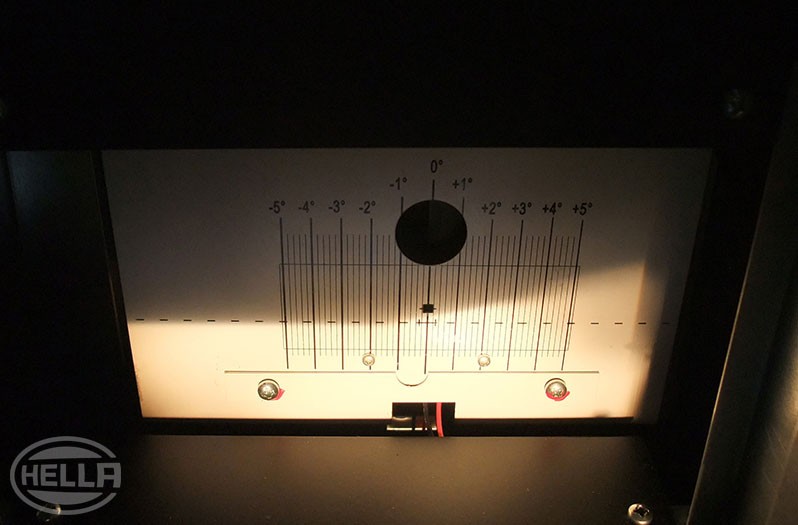
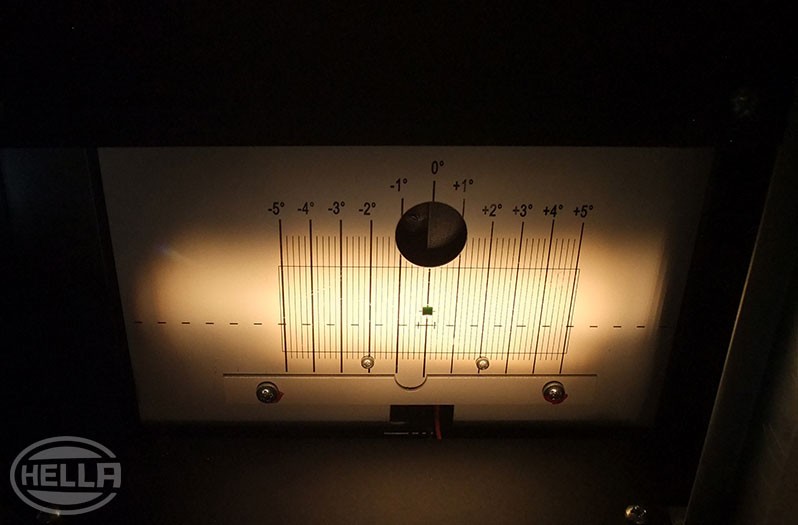
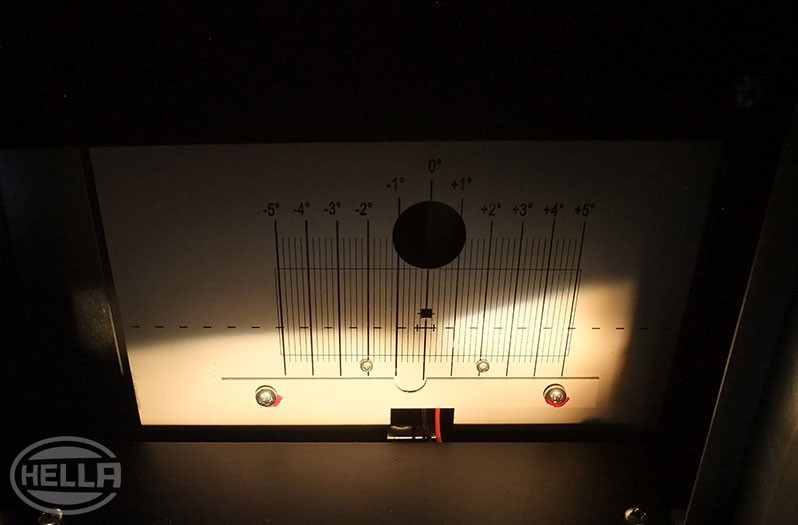
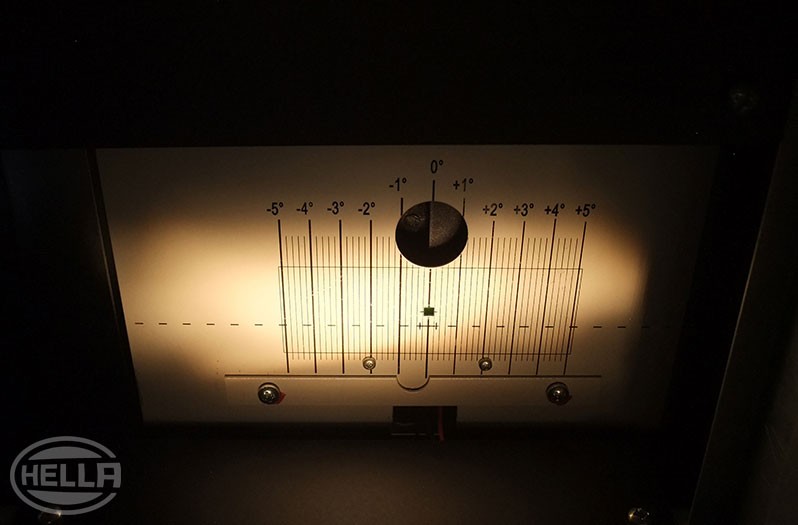
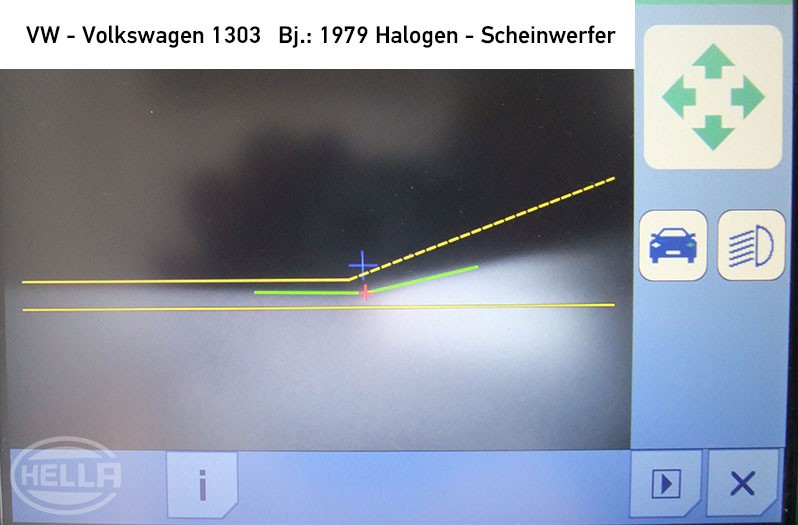
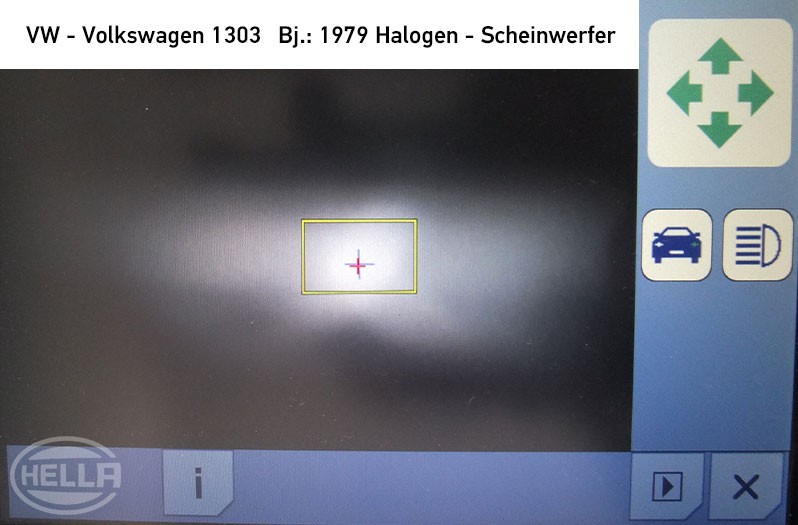
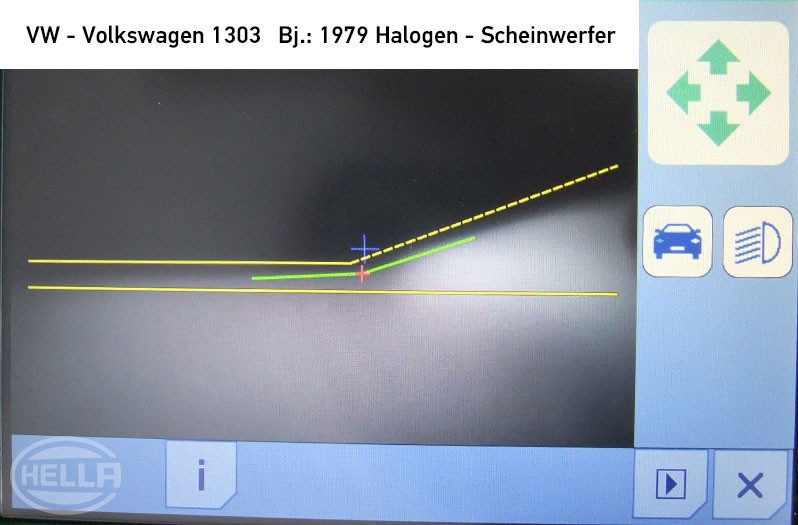
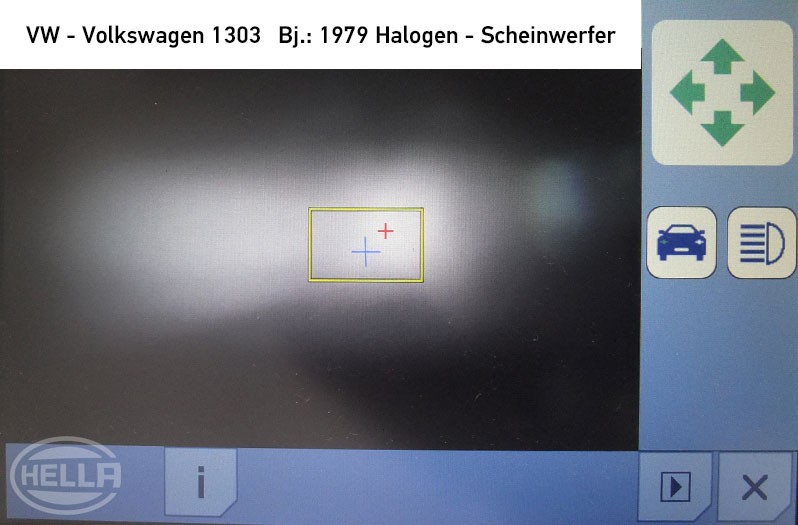
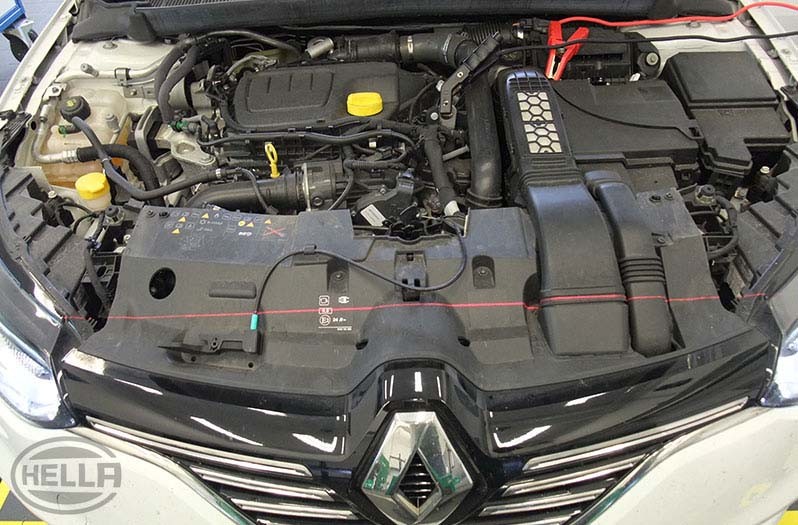
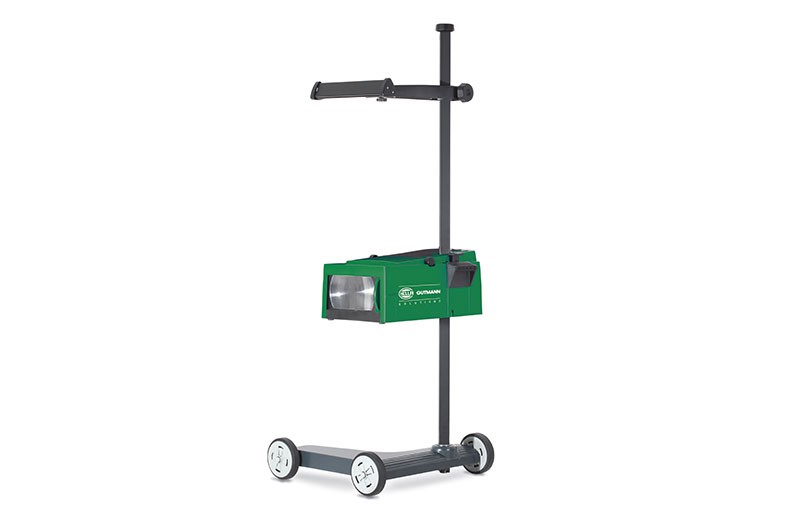
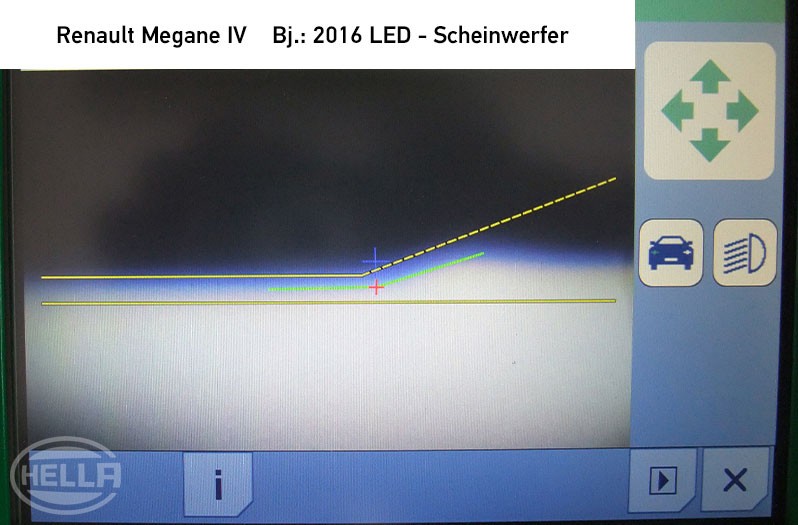
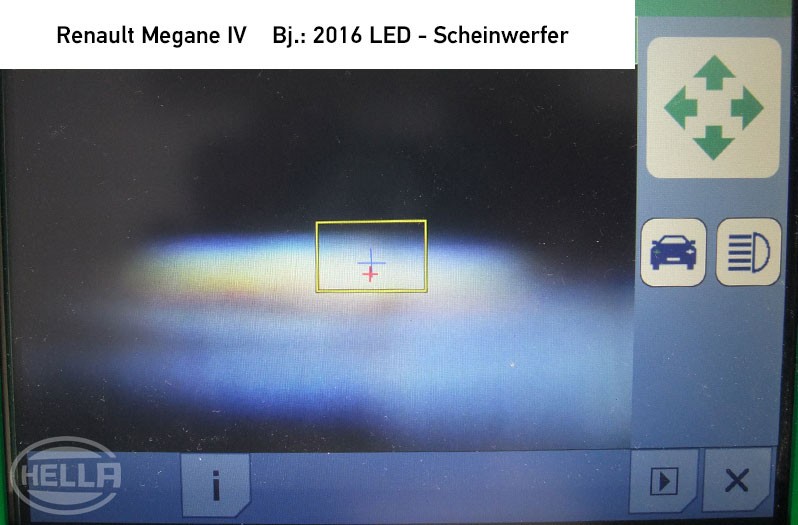
Measurement with the analogue SEG IV beamsetter from Hella Gutmann Solutions is carried out manually. The measurement was first carried out for the dipped beam and main beam of the left headlamp and then for the corresponding right headlamp.

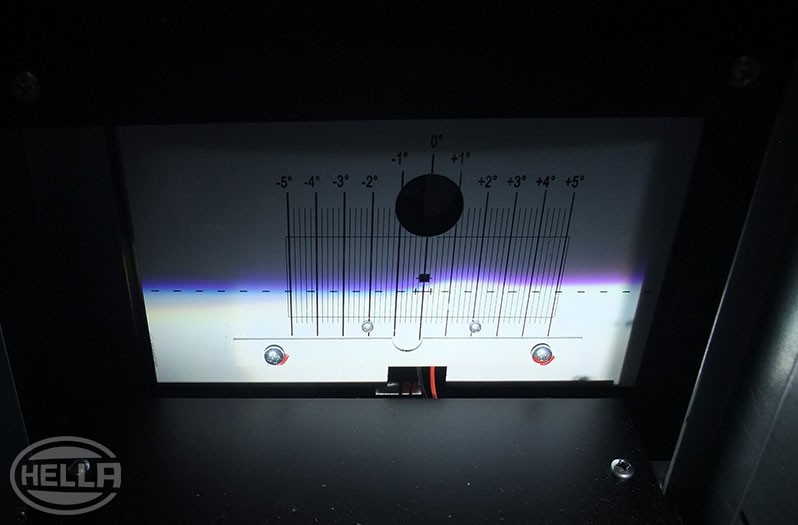
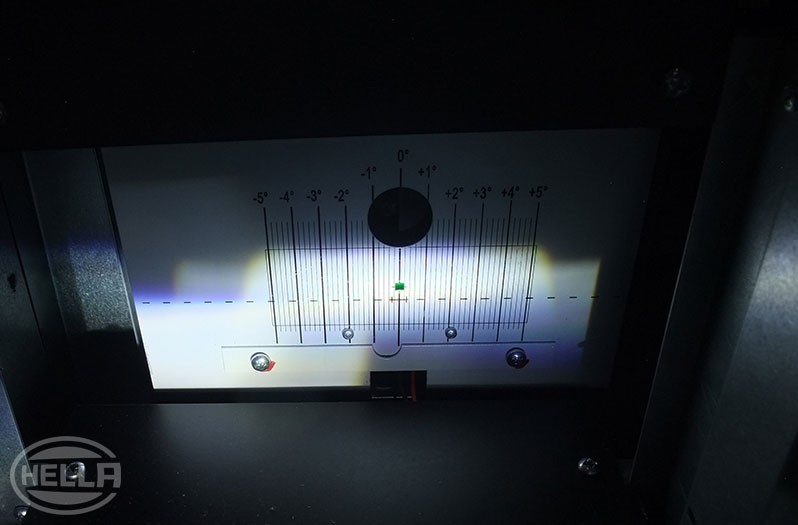
In both cases, a perfect measurement result is obtained with the typical light distributions of this halogen H4 headlamp (see also the version above). There are no deviations requiring adjustment.

2

Digial beamsetter

Measurement with the digital beamsetter is carried out with the camera-based SEG V from Hella Gutmann Solutions. The test procedure is conveniently controlled using the device menu.

The result of the measurements is shown on the display of the SEG. In this case, the green arrows show that the halogen H4 headlamps have been properly adjusted without any deviations occurring in the light pattern.

4. Practical example

Light patterns of LED headlights - Renault Mégane

Measurement results of light distribution of the LED headlamp of a current Renault Mégane IV, model year 2016, as an example. In this case, too, prior to carrying out the test, the correct location for beamsetting is to be selected and all requirements met.

Here the inclination has to be set at 1%.

Please note

Connect charger to ensure correct battery and vehicle electric system voltage.
Perform a visual inspection to check for damage to the headlamp.

1

Analogue beamsetter

Measurement with the analogue SEG IV shows the typical light distributions for this LED headlamp for both dipped and also for the main beam on both sides. As described in more detail above, a correction of the beam setting is not necessary in this case.

2

Digitales beamsetter

When measuring with the SEG V, the measuring procedure is conveniently controlled via the device menu, with the measurement results being shown on the display in each case. The measurement is carried out on each side for the dipped beam and also for the main beam. In this application example, the graphic display on the beamsetter shows a perfect measurement result, which is indicated by the green arrows.

How helpful is this article for you?

Not helpful at all
5
4
3
2
1
Very helpful
Success

Wrong Captcha

Wrong Captcha

Error

Something went wrong

Spare Parts Finder
Manualy Oe-No. Universal Parts
Top manufacturers
Other manufacturers
Vehicle series Back
Vehicle Back

Enter the OE number in the input field. You will usually find the OE number on the spare part itself or in the vehicle documents.

Spare Parts Finder
Simple vehicle identification Also determine spare parts with OE numbers Detailed product information Find wholesalers near you
dummy
Processing Selected Car

Choose category:
Back
dummy
Teilen Sie
Send via Copy link
URL copied to the clickboard !
Article NUmber
Number
Article Number Was Copied !
Search The Web Mounting Instructions
More Details
Name Value
Less Details

Your Dealer
Autoteile Krammer GmbH
dummy
Lechstraße 1-3
68199 Mannheim
Show Map

You might also be interested in

Adjusting headlamps – instructions
Basic Knowledge
Headlamp adjustment – instructions
A general guide to headlight adjustment - with video and tips on optimising light distribution for your workshop.
Reading time: 13 minute
Electronic control units in LED headlamps
Basic Knowledge
Electronic control units in LED headlamps
Find out how electronic control units work and are integrated in modern vehicles with LED headlights.
Reading time: 9 minute
Basic principles of vehicle interior lighting technology
Basic Knowledge
Car lighting technology - Basic principles & lighting technology variables
Lighting technology basics: Knowledge about technical lighting parameters and valuable tips on the right choice of light sources.
Reading time: 11 minute
Headlights
Basic Knowledge
Headlight lens components, types & regulations
Comparison of the four most important headlamp systems, including regulations for vehicle lighting - knowledge for the vehicle workshop.
Reading time: 10 minute
Xenon headlights
Basic Knowledge
Xenon headlights – function and retrofitting
Everything you need to know about xenon headlights, from the function of the ballasts to retrofitting instructions and bi-xenon systems.
Reading time: 5 minute
Basic Knowledge
Audi A6 matrix LED headlights
Reading time: 9 minute
LED headlights
Basic Knowledge
LED headlights for cars – function & adjustment
All about LED headlights: How it works, light adjustment on the Audi A8 and helpful workshop tips for repairs.
Reading time: 15 minute
Lamp setting on a BMW 530d f07
Basic Knowledge
Lamp setting on the BMW 530d
Check the low beam and high beam on the BMW 530d with the SEG V and SEG VI - we'll show you the correct way to do it.
Reading time: 1 minute
Lamp setting on the Mercedes E-Class
Basic Knowledge
Lamp setting on the Mercedes E-Class
How to adjust the headlights of a Mercedes E-Class W212 - testing the low beam and high beam with the SEG V and SEG VI.
Reading time: 1 minute
Lamp setting on an Audi RS 7
Basic Knowledge
Lamp setting on an Audi RS 7
A guide to adjusting the headlights on the Audi RS7 - learn how to correctly adjust the low beam and high beam.
Reading time: 1 minute

Great! Just one more Step

Subscription successful

Head to your inbox and confirm your email address so that you don’t miss our updates!

Get ready for brand new technical videos, car repair advice, trainings, helpful diagnostic tips, marketing campaigns and much more... delivered straight to your inbox every two weeks!