The following technical information and practical tips have been compiled by HELLA in order to provide professional support to vehicle workshops in their day-to-day work. The information provided on this website is intended for use by suitably qualified personnel only.
Alternator damage assessment
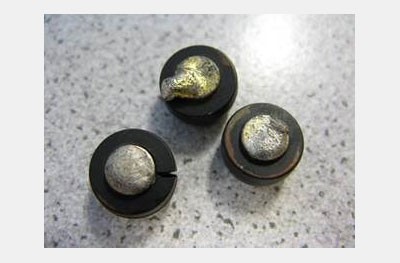
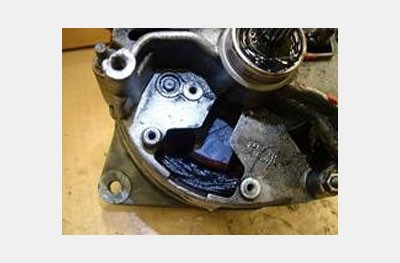
Damage due to short circuit/polarity reversal
Damage due to short circuits/polarity reversal on the alternator can be recognised by interrupted or desoldered power diodes, a desoldered stator winding and/or burnt rectifier components.
Causes: A defective battery or polarity reversal during a jump start will cause an uncontrolled flow of current. The large amount of heat generated by this short circuit destroys the semiconductors and the solder connections melt and are separated.
Effects: The damaged solder connections and destroyed diodes mean that the alternator no longer emits any power
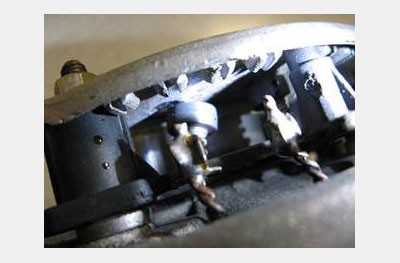
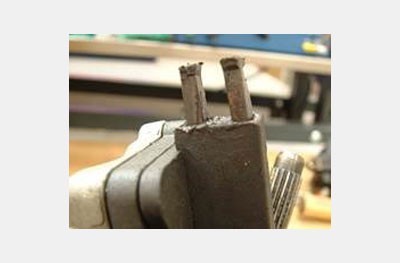
Corrosion damage
Corrosion damage on the alternator can be detected from severe corrosion on the contacts and terminals.
Causes: Alternators are usually splash-proof as standard. If extreme water ingress occurs when washing the engine with a steam jet, driving through deep puddles, etc., or because there are no splash protection covers, this will result in damage to the alternator.
Effects: Extreme water ingress leads to corrosion at the contacts and terminals, damage to the ball bearings and softening of the carbon brushes. Corroded contacts and terminals cause power drops or lead to no power output. Bearing damage will result in a lot of noise or total failure of the alternator.
Important: Existing splash protection covers must always be refitted when replacing the alternator
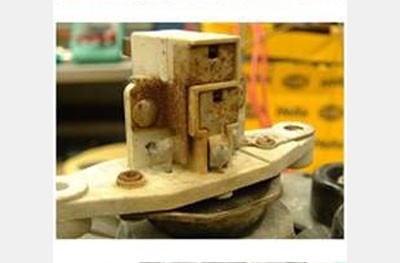
Oil-smeared alternator
Oil entering the alternator causes an oil film to form on the alternator’s housing, windings, slip rings and carbon brushes. The oil softens the carbon brushes.
Causes: If engine oil gets into the alternator because of defective engine seals or hydraulic oil or diesel fuel get in through leaky pipes, a lubricating film forms on the slip rings and the carbon brushes. This causes a mass to form with the abrasion of the carbon brushes, which leads to poor contacting or short circuits. Softening of the carbon brushes also causes premature wear.
Effects: The oil that has entered causes the alternator output to be limited. In most cases, however, oil contamination results in total failure
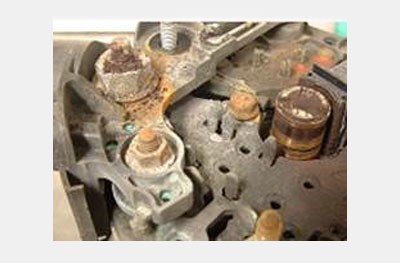
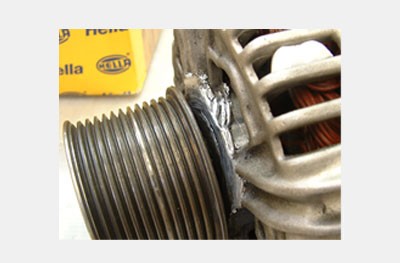
Heavily oiled alternator with vacuum pump
In some vehicles with diesel engines, the required vacuum for the brake booster is generated by a vacuum pump attached to the alternator. A common problem is for these alternators to get completely oiled, causing them to fail.
Causes: One of the most common causes of this problem is the seal between the alternator and the vacuum pump. This seal, usually achieved with a rubber ring, becomes leaky due to ageing but also after replacing the alternator. Often the rubber ring is not renewed and the alternator fails after a short time because of oil seeping in.
Effects: Oil penetration can damage the alternator within a very short time and lead to failure.
Important: The seal between the alternator and the vacuum pump should always be renewed when the components have been separated. Also check the oil and vacuum hoses on the vacuum pump for leak tightness
Bearing damage on the alternator
Bearing damage on alternators can be identified from a considerable amount of noise, rotor radial or axial play, or a blocked rotor.
Causes: Strong vibrations or water ingress are possible causes of bearing damage on alternators. But too much tension on the drive belt can also cause bearing damage or premature wear. The flat ribbed belts can transmit enormous forces to the pulley and thus the bearing.
Effects: A damaged bearing can cause a lot of noise and considerable play for the rotor. This can even be so much that the pulley causes damage to the alternator housing.
Sign up for our free HELLA TECH WORLD newsletter to receive the latest technical videos, car repair advice, training course information, marketing campaign details and diagnostic tips.